This post may contain affiliate links. Please see disclosure policy here.

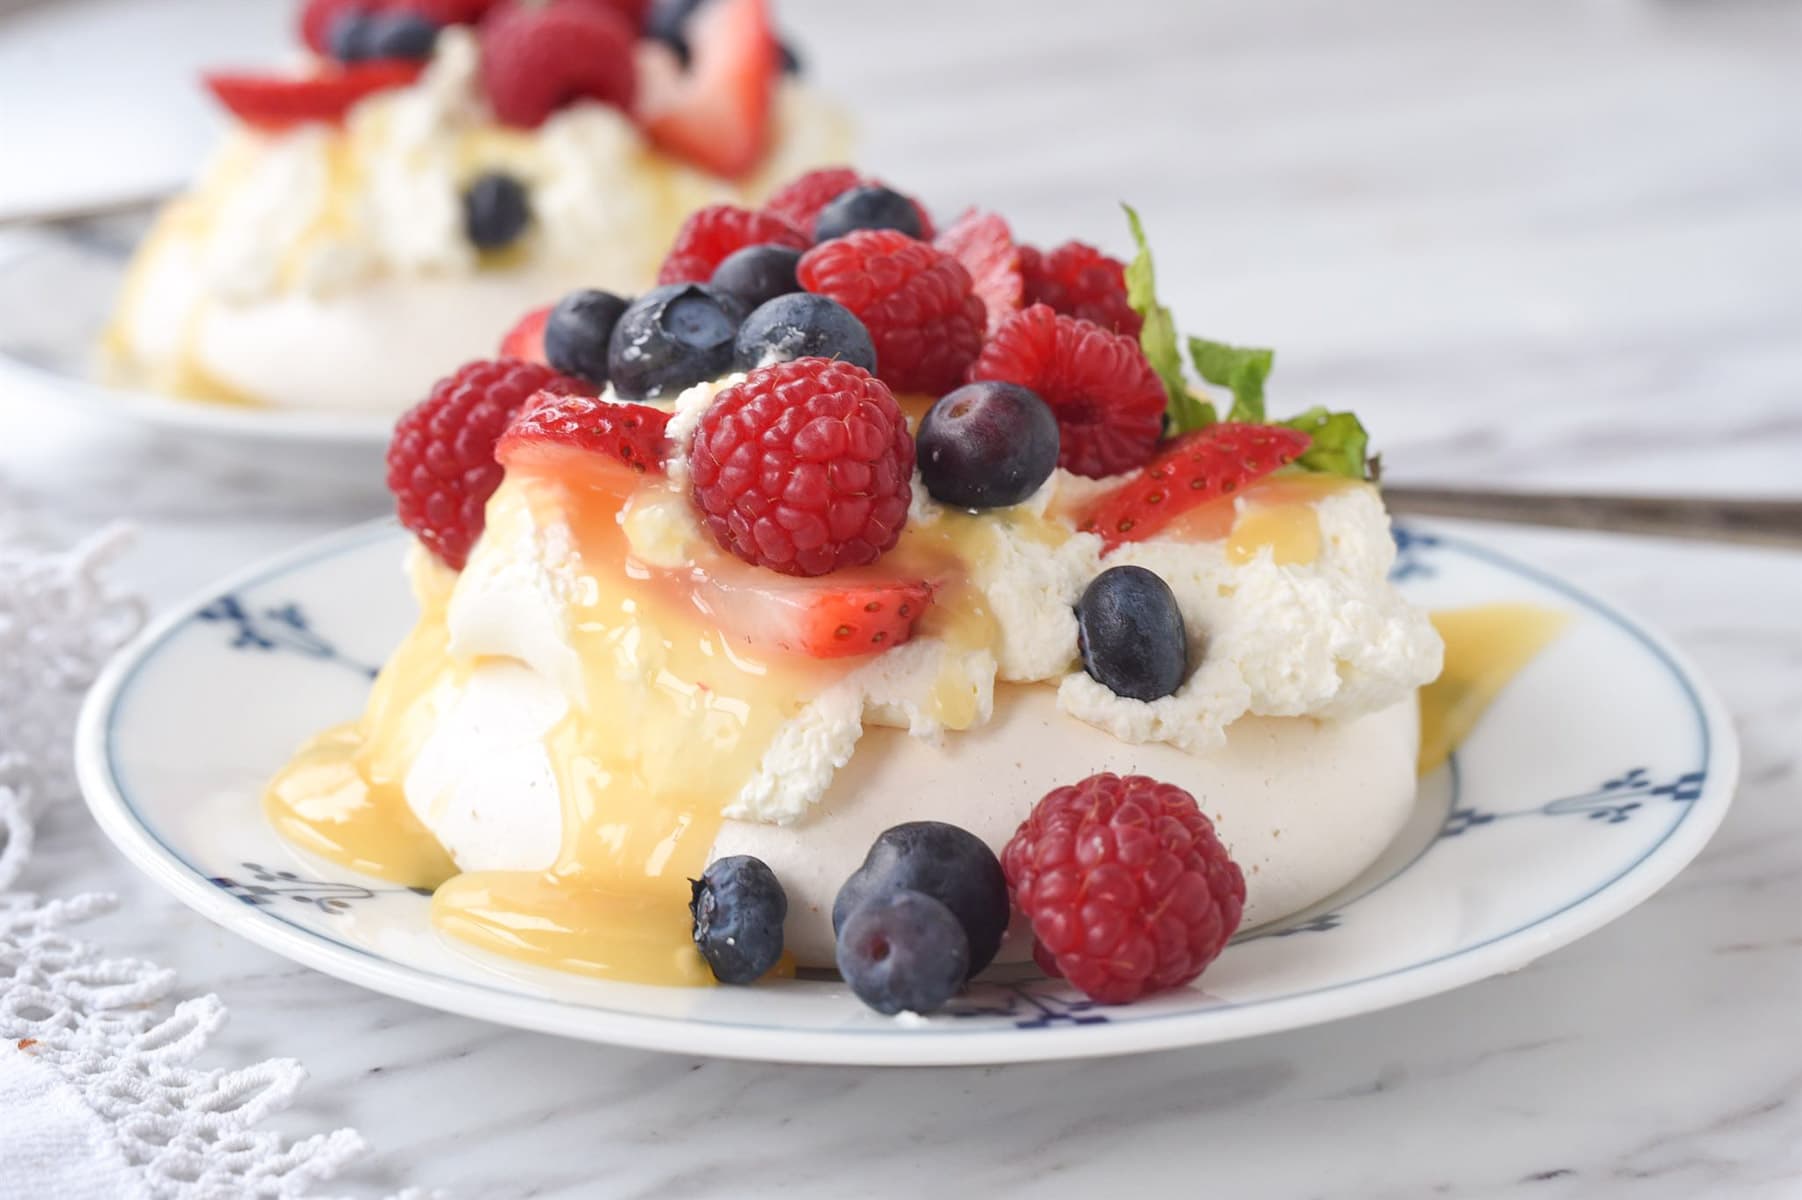
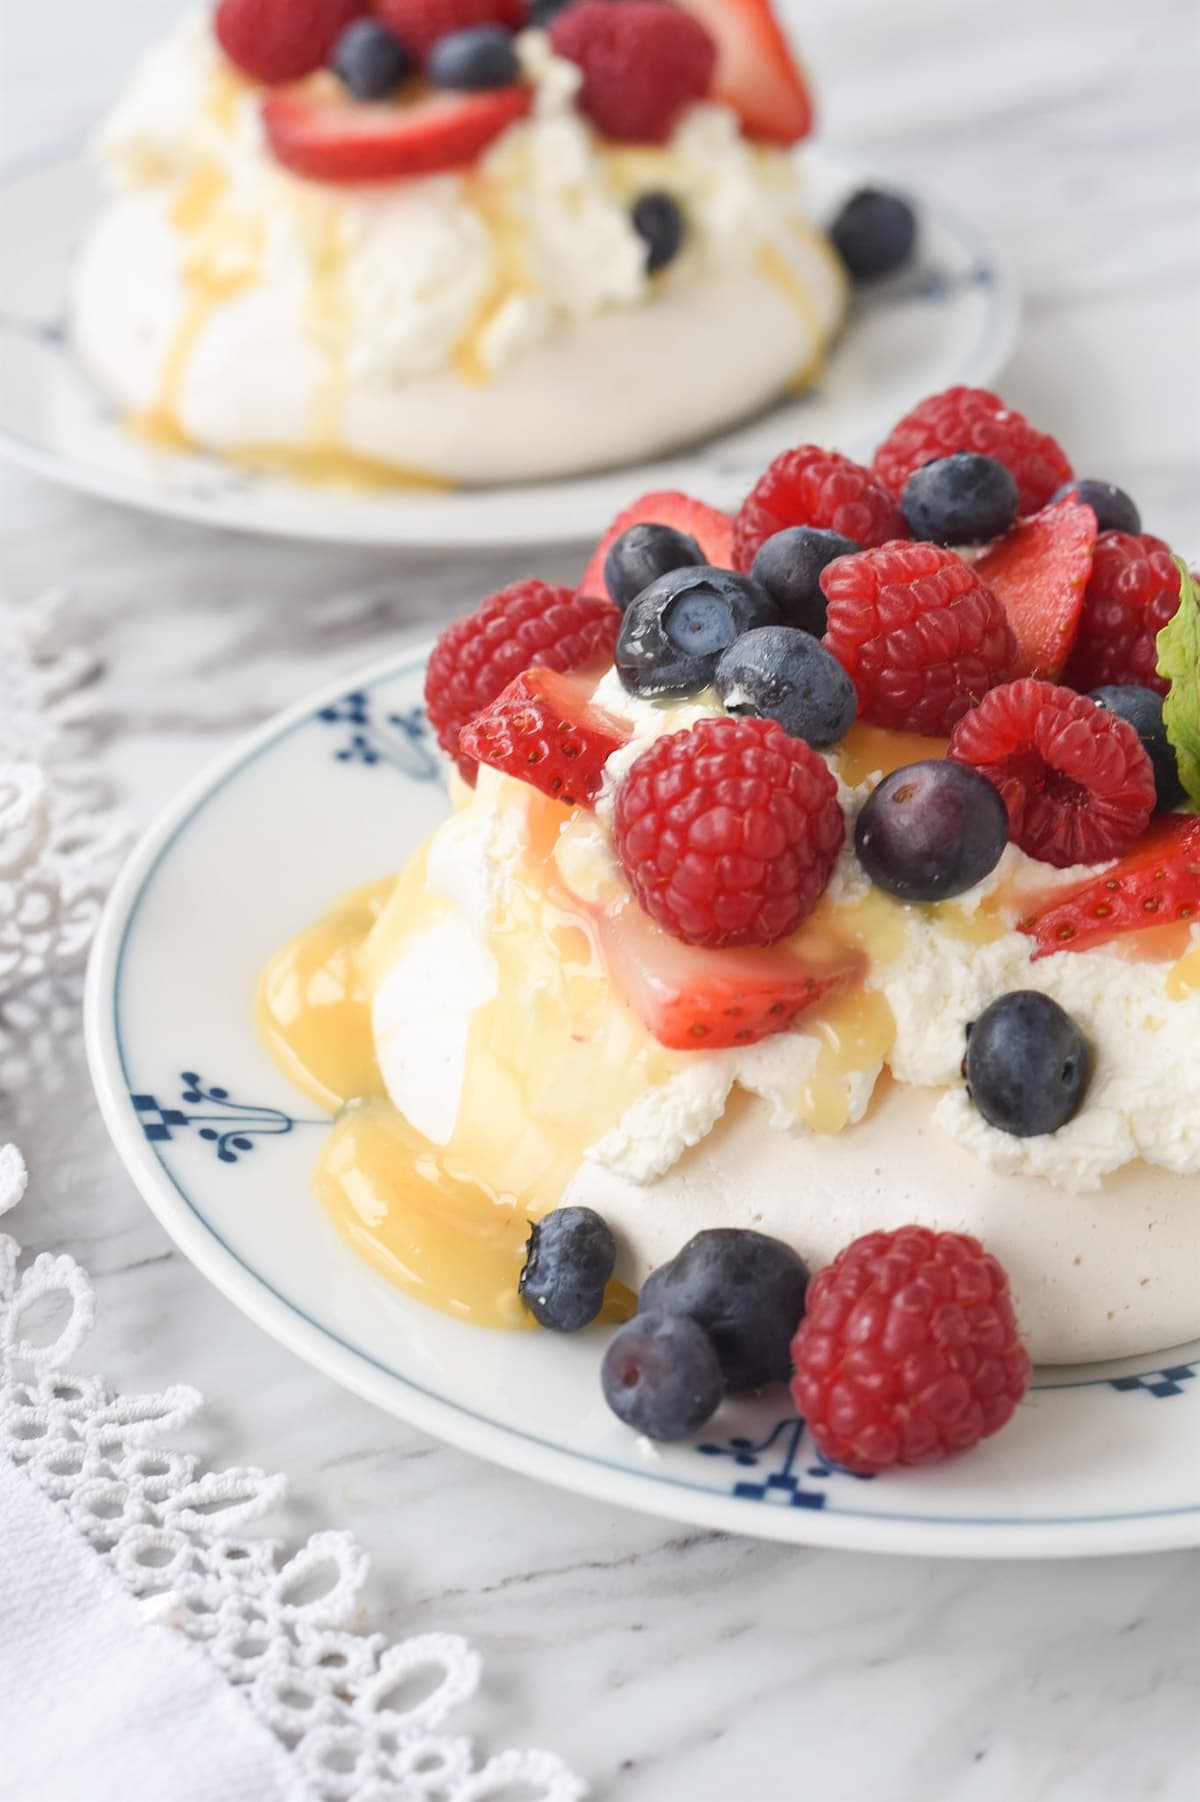
This Mini Pavlova is crisp on the outside and has a marshmallow soft insides. Top it with whipped cream and fruit for the perfect pretty and delicious dessert.

Why You’ll Love This Recipe!
- Pavlova is the perfect prep ahead dessert idea. Make your mini pavlovas the night before and keep them in a dry airtight container. Your fruit can be washed and sliced the day before too. All the sauces can be made ahead of time and all you need to do before serving is whip your cream. The cream can be whipped an hour or so ahead of time and kept refrigerated.
- It’s pretty and delicious. It has a crispy out layer with a soft, marshmallow like center that melts in your mouth!
Ingredients Needed
Sugar. Use superfine granulated sugar, also known as caster sugar,if possible. You can also put your regular granulated sugar in a blender and pulse a few times to make it finer. Do not use powdered/confectioner’s sugar. I have used just regular granulated sugar too, just make sure to incorporate it well so you don’t fell any grittiness in the meringue.
Egg Whites. Use room temperature egg whites but separate the eggs while they are still cold. Use the leftover egg yolks to make some lemon curd.
Vanilla Extract
Cream of Tartar. You can substitute 1 tsp of lemon juice or 1 tsp of white vinegar for the cream of tartar. You must also add in 2 tsp of cornstarch if not using cream of tartar.
How to Make Mini Pavlova
- Line a baking sheet with parchment paper.
- Preheat oven to 300 degrees F.
- In the bowl of a stand mixer, using the whisk attachment, add egg whites and cream of tartar whisking until the soft peak stage. You can also use an electric hand mixer and a glass or metal bowl (avoid using a plastic bowl)
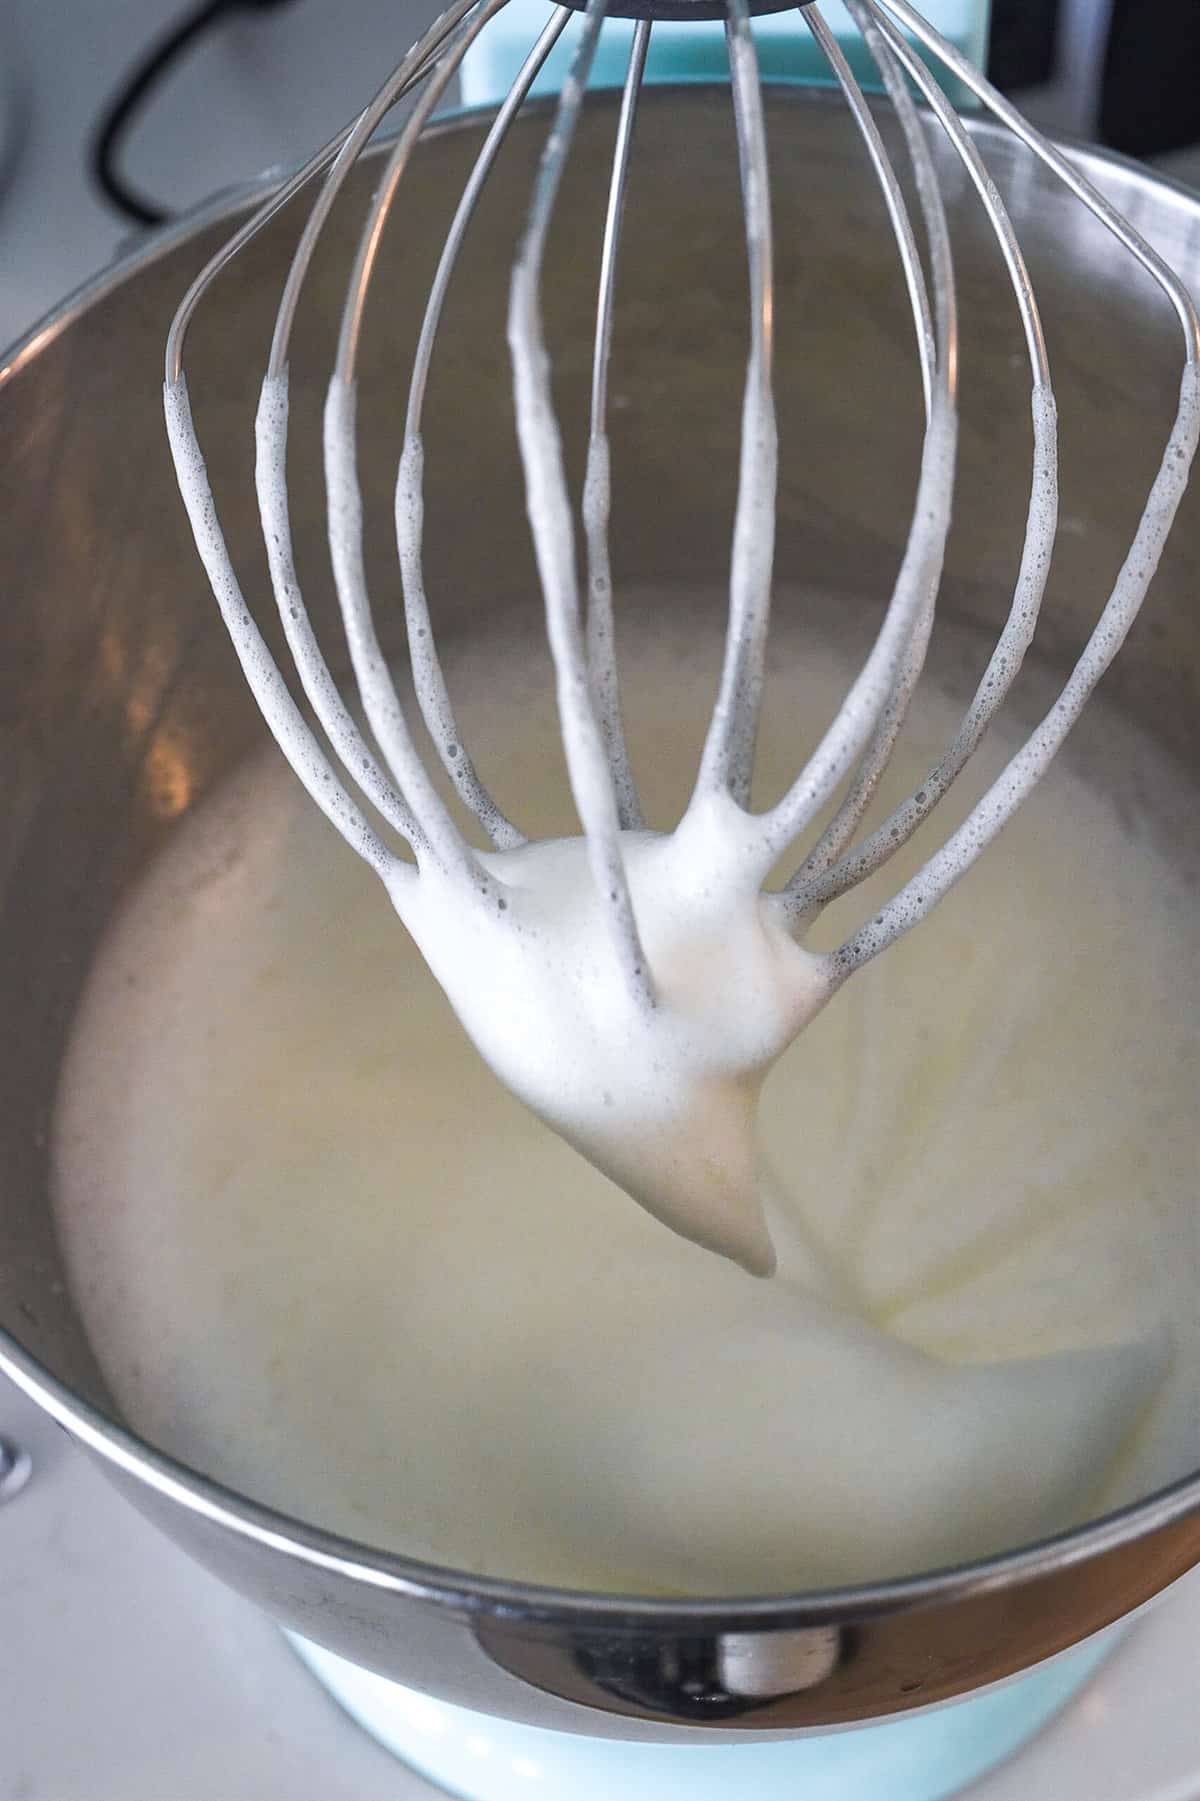
- Slowly add in sugar 1 tablespoon at a time into the mixture, allow to full incorporate before adding in the next tablespoon. This may take up to five minutes and is a very IMPORTANT step. Don’t rush it. Adding your sugar too fast can cause your pavlova to collapse.
- Beat until it turns thick and glossy.
- Add in vanilla and beat for another 1-2 minutes. The meringue will be so thick, smooth and glossy and it will not fall off the whisk when turned upside down.

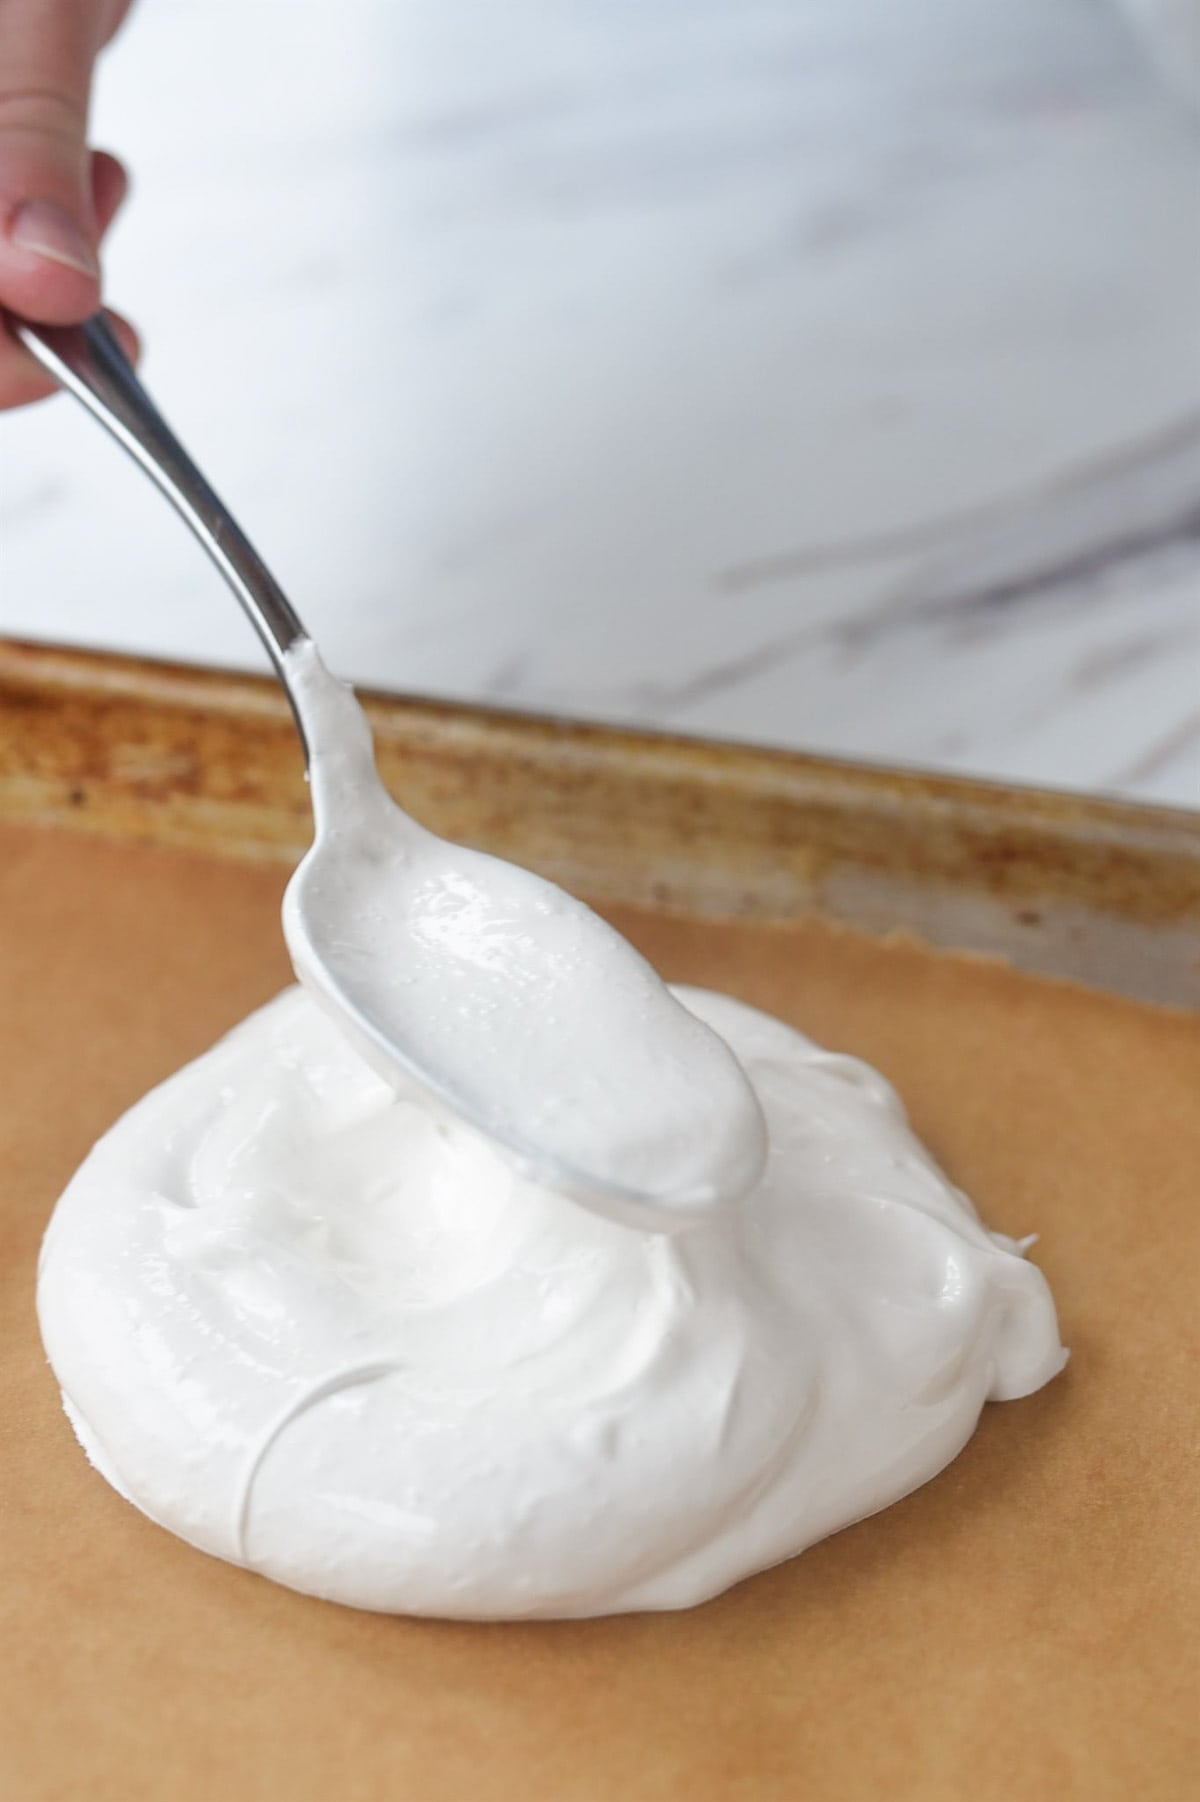
- Spoon the meringue onto your lined baking sheet, forming 4 inch round discs of meringue. Try to make the mini pavlovas even in size and thickness so that they bake evenly. You can fit four on a baking sheet, be sure there is at least an inch of space between them.
- Place in the oven and IMMEDIATELY reduce the heat to 250 degrees F.
- Bake for 40-50 minutes or until they are dry to the touch and remove easily from the parchment paper.
Tips and Tricks for mini Pavlova
- Separate egg whites from egg yolks while the eggs are cold.
- Use allow egg whites to come to room temperature before whipping them with the sugar.
- When separating your eggs be sure not to get any yolk into the white, this will prevent the whites from whipping correctly.
- Be sure your mixing bowl and beater are nice and clean. Dirt in the bowl can cause your egg whites not to whip properly.
- If using a hand mixer use a glass or metal bowl, not a plastic bowl.
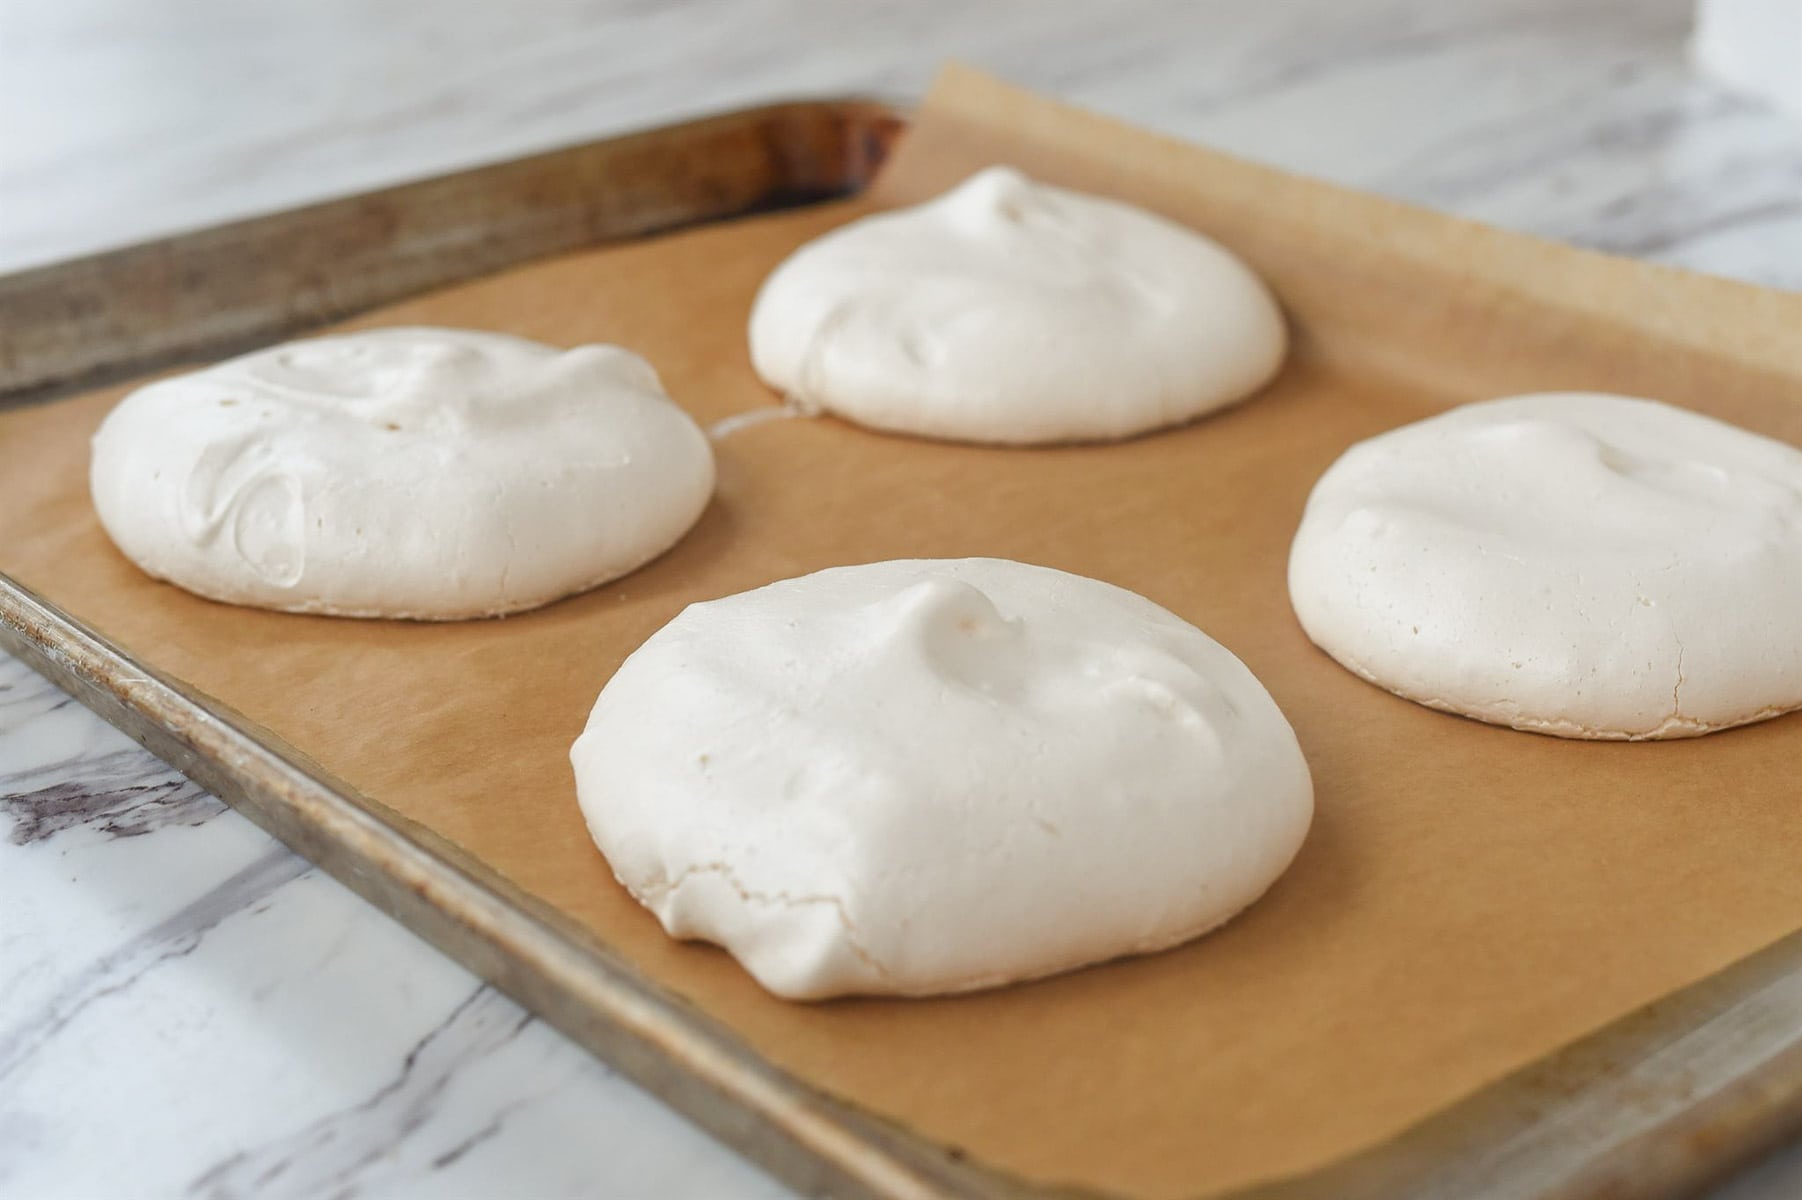
- Turn off the oven and let the pavlovas sit in the oven until the oven is completely cooled.
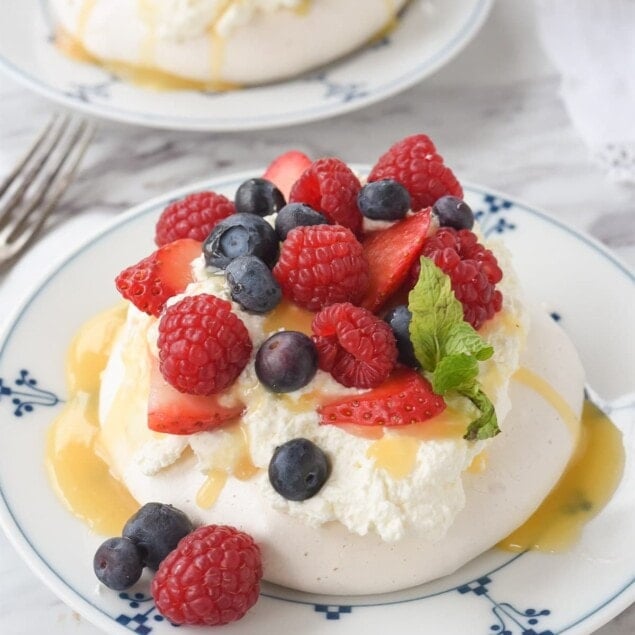
Make Whipped Cream – follow my tutorial for sweetened whipped cream here. The whipped cream is put on top of the mini pavlova making a nice bed for all your other toppings.
How to Assemble Pavlova
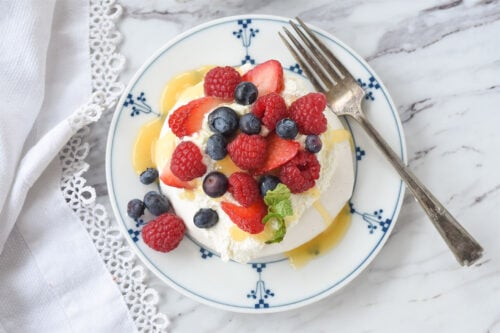
- Place your mini pavlova on a plate.
- Add a large scoop of whipped cream on top of the paloa.
- Drizzle with your favorite topping such as lemon curd (see below for other ideas) and add your assorted fruits. I like to drizzle a little more topping over the top of my fruit too!
Pair This With:
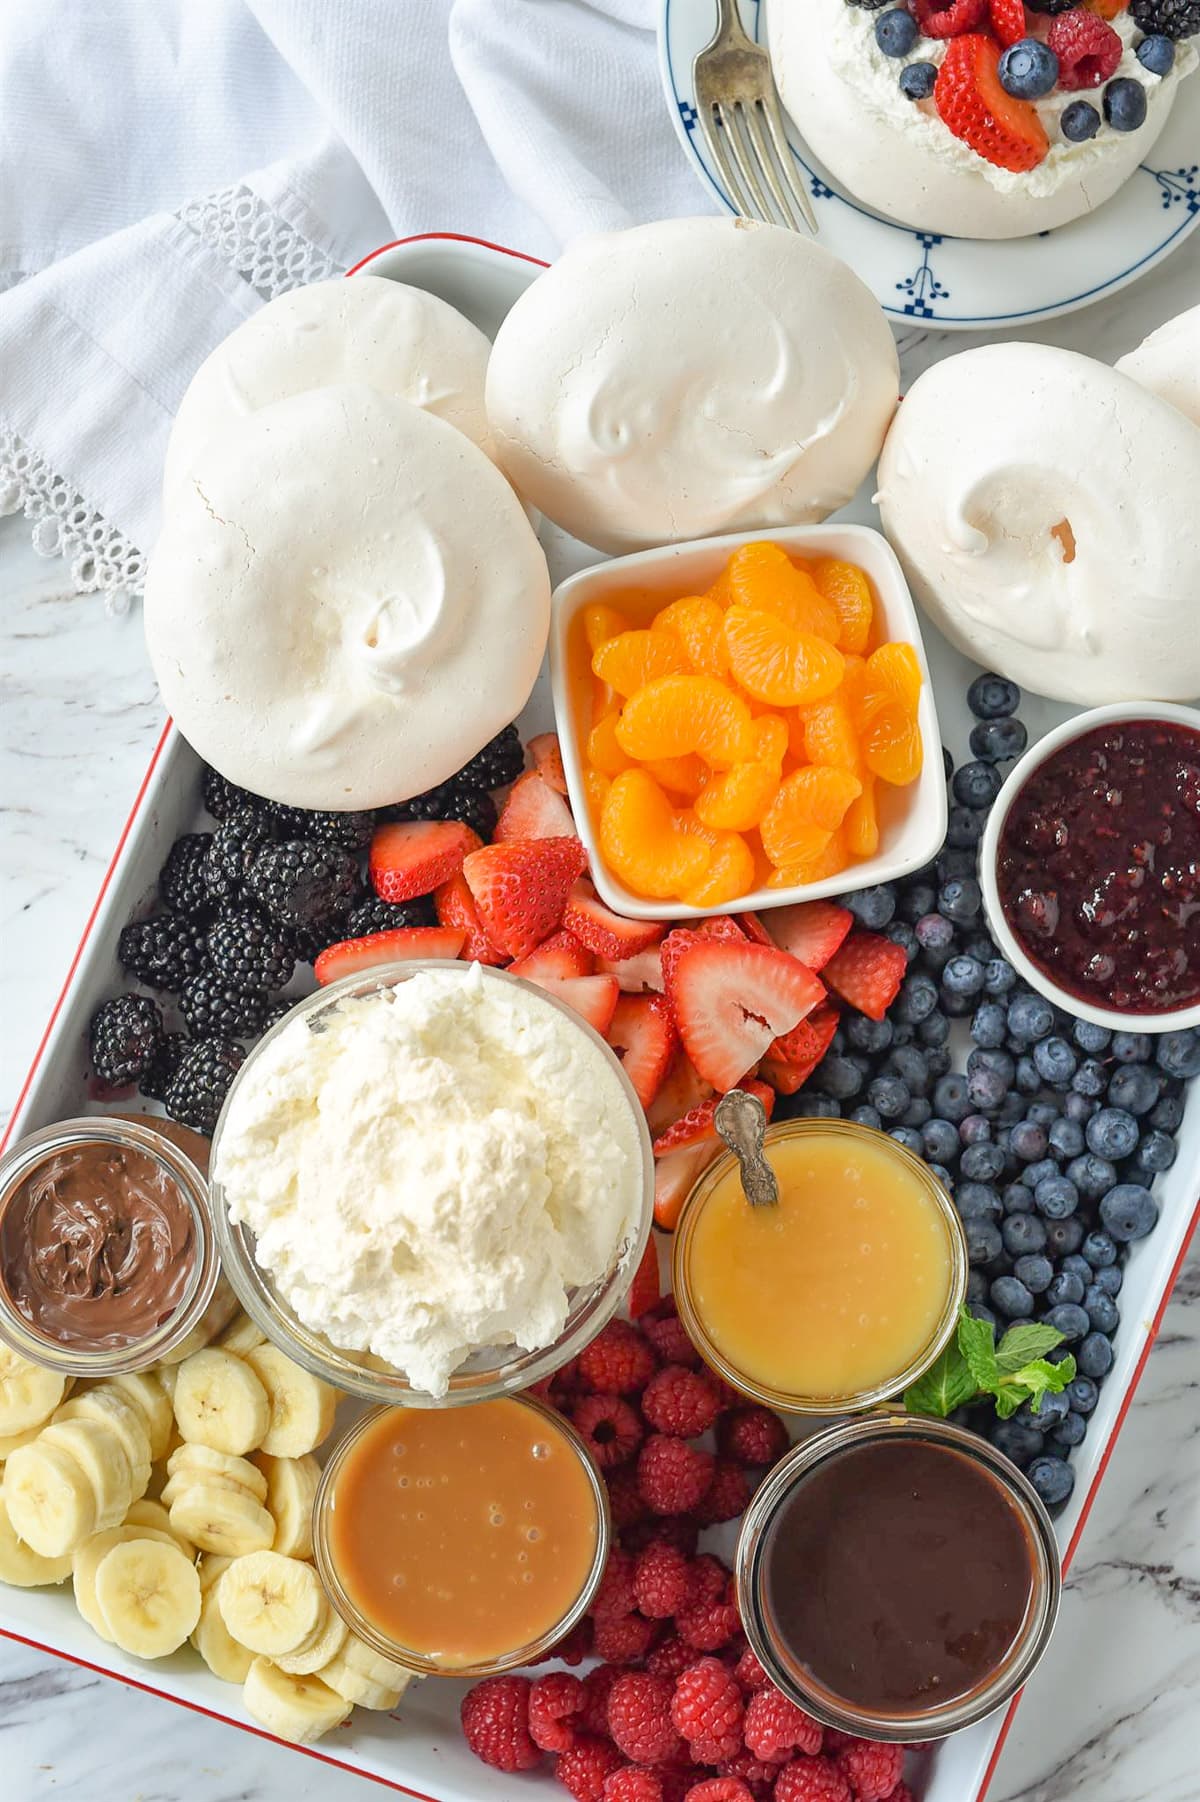
- Fresh fruit such as raspberries, strawberries, blackberries, blueberries, bananas, mango, kiwi, orange segments.
- Sweetened Whipped Cream. Only sweetened a bit as pavlova is very sweet.
- Lemon Curd – this is my very favorite topping for pavlova. I love using my homemade lemon curd and it is the perfect way to use up the egg yolks that are leftover after making your pavlova. Of course store bought lemon curd will do in a pinch.
- Nutella- I like to warm it up so it spreads or drizzles a little bit better.
- Hot Fudge Sauce – my mom’s recipe is my favorite.
- Strawberry or Raspberry Sauce – use the recipe in my Swedish cream recipe.
- Caramel Sauce – It is delicious with salted or regular caramel sauce.
- Strawberry Jam
Variations
Make a mini pavlova dessert board with all the toppings and let people make their own fun combinations. It’s perfect for a party, a baby shower or any event.
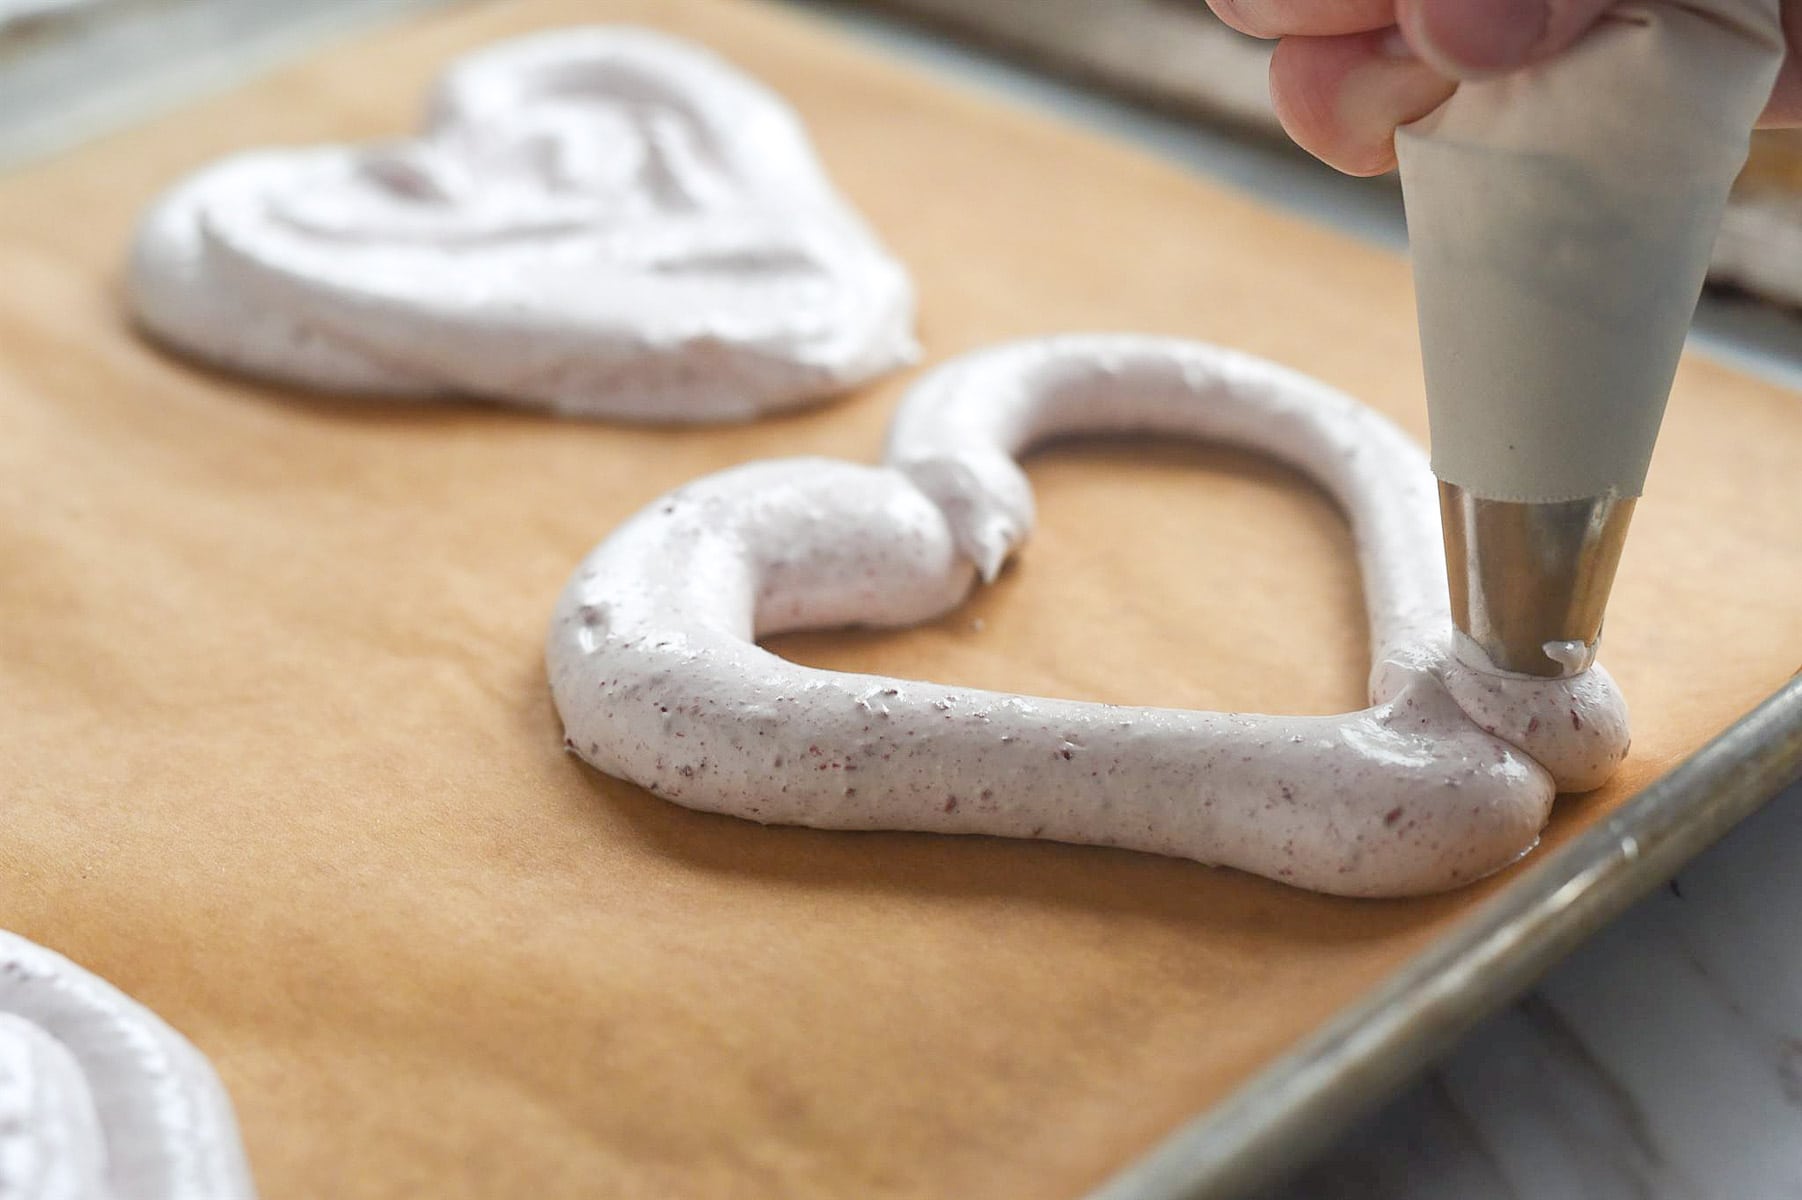
Make your pavlova heart shaped! Fold in 1/2 cup crushed freeze dried raspberries or strawberries before baking and use a round decorating tip and pipe the meringue into a heart shape.
Frequently Asked Questions
What is the difference between pavlova and meringue?
I am often asked if Pavlova is meringue. It is similar and the names are often used interchangeably but the difference is, the pavlova is crispy on the outside and the inside is fluffy and chewy, kind of like a marshmallow. With meringue, it is crispy throughout.
How long will mini pavlova last?
The actual mini pavlova meringues will last a few days if you keep them dry and in an air tight container. Store them in a single layer as they are fragile and can break easily. Once you add the whipped cream and toppings to it they will last several hours refrigerated. It is best to assemble right before serving.
Check out these other fun dessert board ideas:
Be sure and follow me over on YouTube for weekly cooking demos.
Mini Pavlova
Ingredients
- 6 egg whites room temperature
- 1 1/2 cups extra fine sugar
- 1 tsp cream of tartar
- 1 1/2 tsp vanilla
- whipping cream
- assorted fruit
Instructions
- Preheat oven to 300 degrees F.
- Line a cookie sheet with brown paper bag or parchment paper
- In a large bowl, beat eggs whites and cream of tartar until foamy.
- Gradually add in sugar, a little at a time, beating continuously at high speed until sugar is dissolved and stiff peaks form. About 4-5 minutes.
- Beat in vanilla. Beat for 1-2 more minutes.
- Form mini pavlovas into 3-4 inch circles on the parchment paper, leaving 1 – 1 1/2 inches between circles. Will make 6-8 pavlovas depending on size.
- Place in oven and immediately reduce heat to 250 degrees F.
- Bake for 40-50 minutes or until firm and dry to touch. Turn off oven and just let the pavlova's sit in the oven as it cools down or overnight or until I'm ready to use them or store in an airtight container.
- Top with whipped cream, and berries
Tips & Notes:
- Separate egg whites from egg yolks while the eggs are cold.
- Use allow egg whites to come to room temperature before whipping them with the sugar.
- When separating your eggs be sure not to get any yolk into the white, this will prevent the whites from whipping correctly.
- Be sure your mixing bowl and beater are nice and clean. Dirt in the bowl can cause your egg whites not to whip properly.
- If using a hand mixer use a glass or metal bowl, not a plastic bowl.
Recommended Products
Nutrition Facts:
Kathryn says
We had friends for dinner Friday evening and I used the mini pavalova dessert board for our dessert. They loved it and were impressed. This recipe will certainly be one of my go to dessert recipes.
Eva Garcia says
Where did you get your white and red tray for the pavlova dessert.
Love it.
Leigh Anne says
There is a link in the post to it – it’s off of Amazon.