This post may contain affiliate links. Please see disclosure policy here.

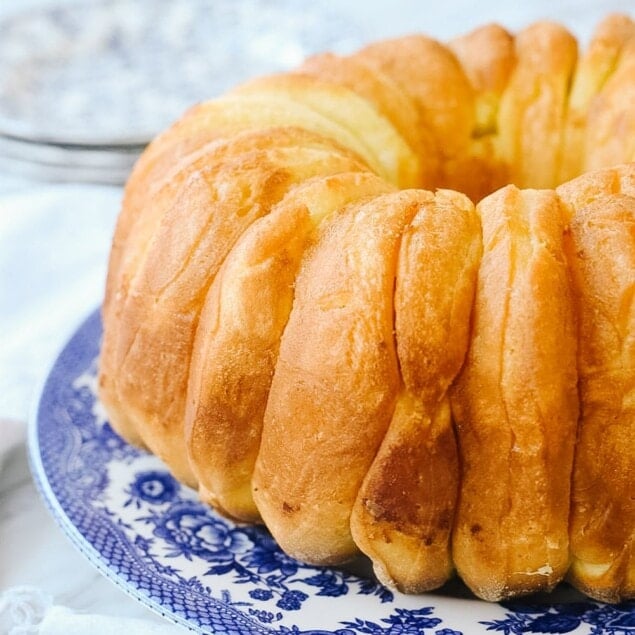
Delicious, buttery pull apart bread is as fun to make as it is to eat. It is best served fresh out of the oven. Just grab a piece and enjoy!

Why You’ll Love This Recipe?
Perfect Side Dish: This is the perfect thing to serve with any main dish.
Delicious. This bread is light, fluffy and buttery. It is fun to make and even more fun to eat. It is also a fun presentation and all you have to do is pull!
Ingredients for Pull Apart Bread
- Water
- Active Dry Yeast
- Granulated sugar
- Eggs
- Butter, salted
- All Purpose Flour
- Salt

How to Make Pull Apart Bread
- Add yeast to warm water and dissolve for 5 minutes. Add sugar to water. I use the bowl of my stand mixer with the dough hook.
- Beat eggs into water mixture
- Add in 3 cups of flour and beat well
- Add 4 additional cups of flour, 4 Tbsp melted butter and salt
- Mix well and knead until all the flour is absorbed
- Put damp cloth over dough and let rise 1 hour or until double in size
- Punch down and put in refrigerator several hours or overnight or use immediately.

- Roll out your dough with a rolling pin on a lightly floured work surface and use a 2 inch round biscuit cutter ( I use my grandma’s old biscuit cutter) to cut out circles of dough.
- Place the circles, standing upright, into your bundt pan that has 1/2 cup of melted butter sitting in it, just waiting to surround your dough!

- Allow to rise for 1-2 hours or until dough is doubled in size, the temperature in your house will effect how fast the dough rises.

- Bake in a 400 degree F oven for about 20 minutes or until bread is golden brown.
- Allow the bread to cool for a few minutes in the pan and then loosen the edges and slide onto a pretty serving dish.

Now, go for it! Just peel off a piece or two or three and enjoy the yummy, buttery goodness that is Buttery Pull Apart Bread!
Tips from leigh Anne
- Loaf Pan Method: (you will need 2 loaf pans), roll half the dough out to a 12 x 16 inch rectangle. Use a pizza cutter to cut the rectangle lengthwise into three equal strips. Then, cut the rectangle crosswise into 5 equal strips so that you are left with 15 pieces. Place half of melted butter into loaf pan and stand dough pieces upright in pan. Repeat with other half of dough. Bake for approximately 40 -45 minutes or until baked through and golden brown on top. Brush with some additional butter before serving.
- How to Serve: Pull Apart Bread is best served warm out of the oven.
- Store Bought Biscuit Method: If you prefer, you can also make this pull apart bread with refrigerated biscuit dough. You will need three refrigerated 16.3 ounce cans of buttermilk biscuits.

Frequently Asked Questions
Can I make pull apart bread in a loaf pan?
If you don’t have a bundt pan you can make this bread in a 9 x 5 inch loaf pan. But you will need two loaf pans. If you only have one, use half the dough to make one loaf and keep the rest of the dough in the refrigerator in an airtight container for 2-3 days. See tips above for how to roll out and cut the dough.
Why did my dough not rise?
There are a few reasons why it may not have risen:
1. Expired Yeast. Be sure to check the expiration date on the package. Store yeast in the freezer to extend the shelf life.
2. Water Temperature. If your water is too hot you will kill the yeast, if it is too cool it won’t activate the yeast. Use a thermometer to check the temperature of your water, you want it between 105-115 degrees F.
3. Proofing Time. Be sure to give your dough adequate time to rise.
4. Environment Not Warm Enough. If your house is cold you may want to proof your dough in your oven. Place the dough in the oven, turn on the oven light and let it rise. Just be sure to remove it before you preheat the oven.
Can I add cheese to this?
Adding some shredded cheese would be delicious. I have a recipe for cheesy pull-apart garlic bread here.
How do I store leftover pull apart bread?
Cover with plastic wrap or aluminum foil or store in an airtight container at room temperature for 2-3 days. It is best enjoyed warm right out of the oven.
Check our more delicious bread recipes:
For all my other favorite kitchen products and tools visit my Amazon Store.
Buttery Pull Apart Bread
Ingredients
- 2 cups lukewarm water
- 2 1/4 tsp yeast
- 1/2 cup sugar
- 2 eggs
- 4 Tbsp butter melted
- 7 cups flour
- 1 Tbsp salt
- 1/2 cup butter melted
Instructions
- Add yeast to warm water and dissolve for 5 minutes
- Add sugar to water
- Beat eggs into water mixture
- Add in 3 cups of flour and beat well
- Add 4 additional cups of flour, 4 Tbsp melted butter and salt
- Mix well and knead until all the flour is absorbed
- Put damp cloth over dough and let rise 1 hour or until double in size
- Punch down and put in refrigerator several hours or overnight
- Melt 1/2 C butter and put in bundt pan
- Divide the dough in half. The other half may be placed back in the refrigerator for the next day, will last 2-3 days
- Roll dough out to about 1/4" to 3/8" thick, cut out using a 2 inch round biscuit or cookie cutter Place one layer of dough rounds, standing up, into the pan.
- Let rise 2 hours
- Bake at 400 degrees until golden brown, about 20 minutes
- Loosen edges and turn onto a plate
Tips & Notes:
- Loaf Pan Method: (you will need 2 loaf pans), roll half the dough out to a 12 x 16 inch rectangle. Cut the rectangle lengthwise into three equal strips. Then, cut the rectangle crosswise into 5 equal strips so that you are left with 15 pieces. Place half of melted butter into loaf pan and stand dough pieces upright in pan. Repeat with other half of dough. Bake for approximately 40 -45 minutes or until baked through and golden brown on top. Brush with some additional butter before serving.
- How to Serve: Monkey bread is best served warm out of the oven.
- Store Bought Biscuit Method: If you prefer, you can also make this monkey bread with refrigerated biscuit dough. You will need three refrigerated 16.3 ounce cans of buttermilk biscuits.
Recommended Products
Nutrition Facts:
Ann LGL says
This is a family favorite of ours too. I like how you put them in on edge it looks pretty- we just blop them in as balls. We also like it done several different ways- with maple sryup, or chocolate chips, or with cinamon and brown sugar, or with Italian spices. All so yummy!!! (We’ve even done it with pop and fresh biscuits- not as good, but works.)
Jill says
I have also had this recipe for years – it was a family favorite that our grandma always made. She’s gone now, but we still make this often in our families. I just thought I would mention that I have great success in freezing one of the Bundt pans and baking later. It’s nice when you’re in a hurry, or for a Sunday dinner, to pull the frozen pan out and just let rise! After arranging the discs in the bundt pan, I raise and bake one. The other, I cover with Saran wrap and tin foil, then immediately put into the freezer (before raising the second time). Just remember to pull out of the freezer several hours before needing it, as it will take 4-5 hours to unthaw and raise. It tastes delicious. I’ve always used it within a month, but it could probably go for two. Also, in trying to be a little healthier, we use one stick of butter between the two bundt pans. We dip each side of the disc in butter and line them up. There will be some butter leftover, and we just pour that over the top. We also have used whole wheat (or half and half) with delicous results. (We use white wheat.)
Lisa says
I’ve always thought it was called Monkey Bread because when you eat it, you look like a monkey…
Laurie says
I have a recipe very similar to this. Only difference is I dip both sides of the dough in butter then press both sides into a sugar and cinnamon mixture before I line them up in the pan. This makes the edges a little crunchy with the cinnamon sugar goodness and the centers still buttery soft. The early morning seminary kids love them!
Michele R. says
I make Monkey Bread but I take small nuggets of bread dough and dip them in butter and then in a cinnamon, sugar mixture, then into the bundt pan. You then let the bread rise and bake it. It’s like a sticky bun when it comes out of the oven – very tasty.
I’m intrigued by your version also. THanks for the great recipes!
Michele