This post may contain affiliate links. Please see disclosure policy here.

Making the Perfect Pie Crust is easy with this step by step tutorial and the results are a perfect crust every time. And all perfect pies start with a perfect pie crust.

Why You’ll Love This Recipe
Nothing can ruin a good pie quicker than a bad pie crust! Pie crust should be flaky and tender and never tough. And there are so many pie crust recipes out there. Some swear by shortening and others promise perfect results with butter. I am here to take all of the worry out of baking the perfect pie crust.
Several years ago a friend and I did a pie crust bake off. We tried all different recipes and combinations to see which one we thought was the flakiest, the most tender, the perfect pie crust. And today’s recipe is the one we liked the best. It is a combination of shortening and butter, so you get the best qualities of both.

Ingredients Needed
- Flour. Unbleached all purpose flour is my preference.
- Butter. Use a good quality butter
- Shortening. I use Crisco
- Salt
Tips from Leigh Anne
- Be gentle and handle the dough as little as possible. Overworking the dough and handling it too much will pretty much guarantee a tough crust.
- Use a combination of shortening and butter. Butter gives you great flavor and shortening gives you a flaky crust. It’s the perfect combo.
How To Make Pie Crust
- Combine shortening, butter, flour and pinch of salt in a deep bowl.

- Using your hands or a pastry blender, combine the ingredients until little pebbles form. Using a pastry blender will help keep the dough from getting too warm.
- Add water. Your water needs to be cold. I put some water in a cup and then fill it with ice cubes. You don’t need much water. I can’t tell you the exact amount because it will vary according to the day, the weather, etc. I just splash a small amount into the bowl and then use a fork to start “fluffing” the dough until it starts to hold together.

- Do not pour a bunch of water into the bowl! Add it teaspoon by teaspoon just until the dough holds together.
- Use your hands to form it into a ball. The dough should be soft and moist, but not wet.

- Divide dough into two balls. While working with one keep the other covered so it doesn’t dry out. Or if you only need one pie crust, you can freeze the second piece for later.
- If the dough has gotten warm, wrap it in plastic wrap and chill it for 30 minutes or so to make it easier to work with. When ready to work with it, place the dough you are using on a layer of wax paper and flatten it.

How to Roll Out Pie Crust
- Using a rolling pin, roll the dough out into a circle. If you are using a 9 inch pie plate make sure your circle is bigger than 9 inches. Use flour to keep the dough from sticking to the rolling pin.

- Lift up the wax paper and flip the pie crust over and into the pie pan. Remove wax paper and press the dough into pie pan.

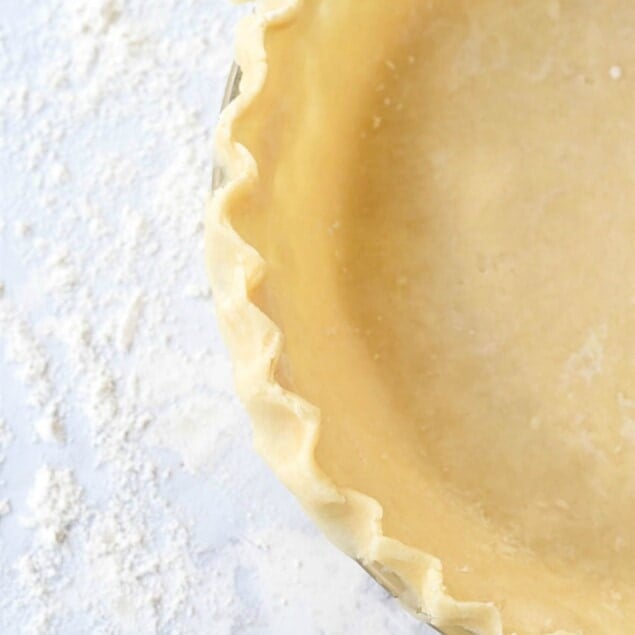
- Using your fingers, form an edge around the pie and then if you are not using a top crust, flute the edge of the crust.

- Cover the pie with foil or plastic wrap. Put covered pie in the freezer for about 30 minutes to allow the pastry to firm up a bit and to prevent shrinkage while baking.

- Depending on the type of pie you are making you may fill the pie or bake the crust first. For Grandma Zola’s Chocolate Meringue Pie I blind baked the crust first.

Frequently Asked Questions
What is a blind baked pie crust?
Blind baking is the process of baking a pie crust without the filling. Baking blind is done for cream pies where the filling will not be baked. It is also used for pies and quiches when the filling has a shorter bake time than the crust. Blind baking is also used to keep a pie crust from becoming soggy due to a wet filling. It is also called pre-baking.
Can I freeze pie crust?
Pie crust freezes great. Form the dough into a flattened disc, wrap in plastic wrap and then place in a zippered freezer bag. It will last in the freezer for 1-2 months.

How to Blind Bake a Pie Crust
There are a couple different methods for blind baking a pie crust
Method 1:
- After placing pie crust in pie plate, freeze for 30 minutes.
- Remove from refrigerator and line your pie crust with parchment paper. Fill with pie weights which are ceramic or metal beads. You can also use rice or dried beans. Remove the weights and paper after Bake at 425 degrees F for 12-15 minutes and then remove weights and paper, the crust will just beginning to turn golden brown. Bake for an additional 5-10 minutes or until crust is totally golden brown
Method 2:
- An easier method is to pierce the crust with a fork to produce small holes after freezing for 30 minutes. The holes will allow steam to escape and prevent crust from bubbling up. Bake at 425 degrees F for 15-20 minutes or until crust is golden brown.
Check out more of my favorite recipes:
Be sure and follow me over on YouTube for weekly cooking demos.
Pie Crust Recipe
Ingredients
- 2 1/2 C all purpose flour
- 1/2 C butter
- 1/2 C shortening
- pinch of salt
- ice cold water add teaspoon by teaspoon until right consistency has formed
Instructions
- Place flour, salt, butter and shortening in bowl.
- Use your hands to combine ingredients until small pebbles form
- Add cold water a teaspoon at a time until the dough begins to hold together and form a ball.
- Do not over handle the dough. Dough should be soft, moist but not wet.
- Divide dough in half.
- Place ball of dough onto wax paper and flatten. Place another piece of wax paper over the top and roll out the pastry into a circle. If your pie pan is 9 inch make sure your circle is bigger than 9 inches so you have enough for the edging..
- Remove the top layer of wax paper and place pastry into pie tin. Remove other piece of wax paper and press pastry into pan. Use your fingers to crimp the edge of the crust.
- Freeze for 30 minutes to firm up the pastry. This helps prevent pastry from shrinking during baking.
- Prick the bottom of crust to prevent bubbling during baking.
- If pie calls for a baked crust bake at 400 degrees. For the first 10-12 minutes keep the edges of pie covered with foil and then remove for the last 15 minutes. Bake until golden brown.
- Recipe makes two 9″ pie crusts
Tips & Notes:
- After placing pie crust in pie plate, freeze for 30 minutes.
- Remove from refrigerator and line your pie crust with parchment paper. Fill with pie weights which are ceramic or metal beads. You can also use rice or dried beans. Remove the weights and paper after Bake at 425 degrees F for 12-15 minutes and then remove weights and paper, the crust will just beginning to turn golden brown. Bake for an additional 5-10 minutes or until crust is totally golden brown
- An easier method is to pierce the crust with a fork to produce small holes after freezing for 30 minutes. The holes will allow steam to escape and prevent crust from bubbling up. Bake at 425 degrees F for 15-20 minutes or until crust is golden brown.
Nutrition Facts:
Nicole says
Thanks! I am going to make a pumpkin pie for Christmas per my son’s request and am nervious about the crust. This makes it less stressful. Question, if I freeze half of it for later, so I freeze it in ball form? How do I handle the defrosting (counter? fridge?)? Also, so I need to worry about it being tougher or more dry? Thanks again!
Jillene@inkhappi says
This is an awesome tutorial! The one I will follow to create my perfect pie crust! pinned! Thanks for sharing.
Georgia Ferguson says
Leigh Anne, I don’t know you but I totally feel like I do. Every single recipe I make from your blog turns out wonderfully. It seems like the recipes people ask for the most are the ones that come from your blog, including this pie crust. The tastiest, flakiest pie crust ever! At any rate, I just thought I’d let you know this is my favorite blog. Keep it up. I don’t know what I’d do without you!
Leigh Anne says
Georgia, You are so sweet! I am so glad you enjoy the recipes on the blog and thank you so much for letting me know. It means a lot!
Cera says
Happy Thanksgiving, Leigh Anne!
I wanted to let you know that I tried a Gluten Free version of this pie crust last night for our Thanksgiving celebration today, and it worked pretty well! At first I was thinking it was going to be a flop, but after a night in the fridge, it tastes pretty fantastic. I used the crust to make a dutch sour cream apple pie.
The flour mix I used was: 3/4 c + 6 T White Rice Flour, 1/4 c + 2T of Sweet Rice Flour, and 1/4 c. + 3 T each of Potato Starch, and Tapioca Starch, 1 1/2 t. Xanthan gum
I used your recommended 1/2 c. of each butter and shortening. It was a bit much for the flour mix, so next time I think I’ll play around with the fat and go 1/3 c. of each. Also, this dough definitely requires refrigeration BEFORE trying to roll out between waxed paper. I divided the dough and pressed it into med. sized rounds and then refrigerated for about a half hour. You have to work FAST in order to get it rolled, transferred to the pie plate and edges fluted before the dough gets too warm. I actually re-refrigerated it for a bit before I was able to get the edges fluted. Then I did freeze it for about 15 minutes before filling and baking.
When it came out I was seriously bummed! The crust seemed like it was going to disintegrate into powder. I cooled it on a rack and, when cooled, covered the pie and put in in the fridge to deal with in the morning. Well, this morning the crust was just fine and it sliced and plated well! HOORAY!!
Hope you and your family have a blessed day of giving thanks. And here’s hoping your GF girl gets some wonderful pie! 🙂
Cera Lamken
Leigh Anne says
Thanks for the gluten free version – will have to try that for Christmas for Cali. I made a gluten free, dairy free pumpkin pie for her. I used nuts and dates for the crust and coconut milk in the pumpkin filling.
Aubrey @ Real Housemoms says
Thanks for sharing this with us over at Real Housemoms for Fabulous Fridays! I was so excited to see it there!