• Skip to primary navigation
  • Skip to main content
  • Skip to primary sidebar
Free Instant Pot Recipe Guide! download now!

FREE 5 Instant Pot Meals in 5 Minutes E Course!


Thank you for subscribing!


Your Homebased Mom

  • About
  • Latest
  • Contact
NEW! Watch on youtube!

Your Homebased Mom

Leigh Anne Wilkes

  • Recipes
    • Course
      • Appetizers
      • Beverages
      • Bread
      • Breakfast and Brunch
      • Dessert
        • Bars and Brownies
        • Cake
        • Candy and Treats
        • Cookies
        • Ice Cream
        • Pie
      • Main Dishes
      • Salads
      • Sandwiches and Burgers
      • Sauces and Dressings
      • Side Dishes
      • Soup
    • Cooking Method
      • Crock Pot
      • Grilling
      • Instant Pot
      • One Pan
      • Oven
      • Quick and Easy
      • Recipes for Two
    • Ingredients
      • Beef
      • Eggs
      • Pasta
      • Pork
      • Poultry
        • Chicken
        • Turkey
      • Seafood
      • Vegetarian
      • Gluten Free
    • Cuisine
      • American
      • Asian
      • European
      • Indian
      • Italian
      • Mediterranean
      • Mexican
    • Holiday
      • New Year’s Eve
      • Valentine’s Day
      • St. Patrick’s Day
      • Easter
      • 4th of July
      • Halloween
      • Thanksgiving
      • Christmas
  • Travel
    • Europe
    • United States
      • New York City
      • Portland
    • What To Wear
  • Life
    • Home
    • Party Ideas
    • Empty Nesters
    • Church
      • Activity Day
      • Relief Society
    • Organizational Tips
    • Recommended Reads
  • New? Start Here
  • Subscribe for weekly recipes

    FREE 5 Instant Pot Meals in 5 Minutes E Course!


    Thank you for subscribing!


Recipe Finder

  • Course
    • Appetizers
    • Beverages
    • Bread
    • Breakfast and Brunch
    • Dessert
    • Main Dishes
    • Salads
    • Sandwiches and Burgers
    • Sauces and Dressings
    • Side Dishes
    • Soup
  • Cooking Method
    • Oven
    • Crock Pot
    • Grilling
    • Instant Pot
    • One Pan
    • Quick and Easy
  • Ingredients
    • Beef
    • Eggs
    • Pasta
    • Pork
    • Poultry
    • Seafood
    • Vegetarian
    • Gluten Free
  • Cuisine
    • American
    • Asian
    • European
    • Indian
    • Italian
    • Mediterranean
    • Mexican
  • Holiday
    • New Year’s Eve
    • Valentine’s Day
    • St. Patrick’s Day
    • Easter
    • 4th of July
    • Halloween
    • Thanksgiving
    • Christmas
Home / Latest Posts / Life / Party Ideas / Three Tiered Stand

Three Tiered Stand

Share
Share on:
By: Leigh Anne WilkesPosted: 6/09/11Updated: 5/29/25

This post may contain affiliate links. Please see disclosure policy here.

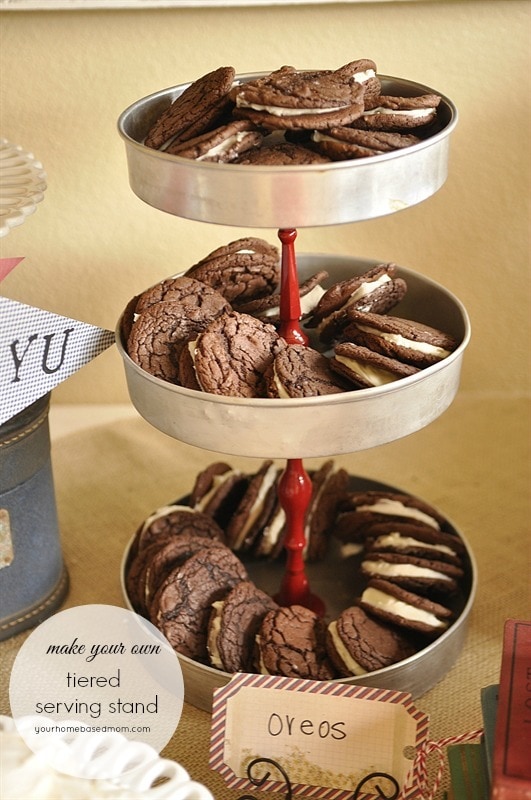
This cute DIY Three Tiered Stand makes the perfect way to display desserts and appetizers.

Smart Cookie Party

Over at Pinterest I have a Board where I collect pictures of things I’d like to make some day.

Because of my “mild” addiction to cake plates and tiered serving pieces I knew I had to make this cute piece as soon as I saw it.  I added it to my Getting Crafty Board and then headed to Goodwill.

Smart Cookie Party

The original idea came from The Crafting Chicks.  She was inspired by this one over at Pottery Barn which cost $69.00!

The total cost for this piece was less than ten dollars.  The most expensive item was the spray paint which was four dollars.  Each of the other items were only 99cents a piece. I already had the glue so didn’t need to buy any of that.

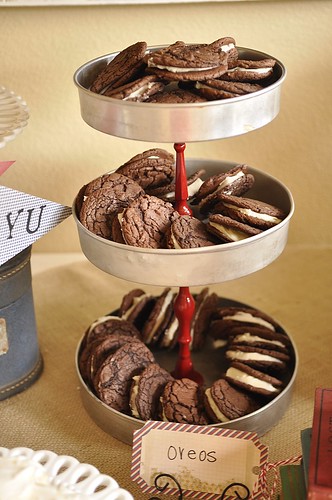
I thought it looked perfect at my Smart Cookie Party full of homemade Oreos.

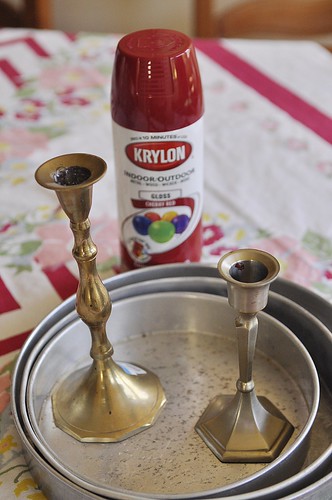
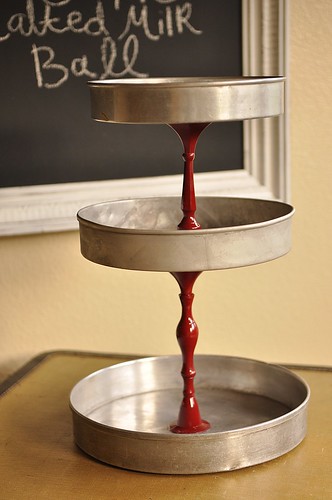
All you need are two metal candlesticks.  They can be the same style and design or different.   Mine were different styles and measured  5 inches and 7 inches tall.

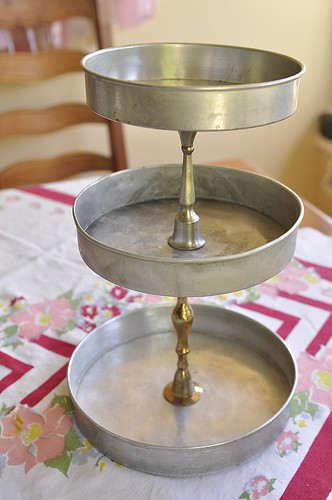
You also will need 3 metal pie tins – 3 different sizes.  Mine measured 7 inches, 8 inches and 9 inches.

_dsc0821

You can experiment with which way you put it together.  I actually put my candlesticks upside down so the bigger bottom was on the top.

_dsc0826

Next, spray paint your candlesticks your color of choice.  I went with Krylon Cherry Red.  Red is always my color of choice because it is so versatile and works great for lots of different holidays.  Plus I have a lot of red in my house.

After the paint has dried you can glue it all together.  I used  the Amazing E-6000 glue which is good stuff and can be found at Michaels or Joann Fabrics.

Here it is ready to fill with goodies.

_dsc0044

Besides food, I am planning on filling mine with little clear glass votive holders.  It will look lovely out on the patio in the summer.

Have fun!

Previous Post
Crepe Bar Bridal Shower
Next Post
Grad Party Decorations

Reader Interactions

Leave a Review Cancel reply

Your email address will not be published. Required fields are marked *

Made this? Rate this recipe:


  1. Valery Bunnell says

    Posted on 6/9 at 9:46 am

    I’ve gotta ask what processing you do or what action you use to get that super pretty, warm, vintage look to all your photos. I just love it!

    Reply
    • Leigh Anne says

      Posted on 6/9 at 3:25 pm

      I actually don’t use any actions – most of my shots are SOOC (straight out of the camera) with only a little lightening and sharpening. I shoot in manual and use the shade setting in my white balance which gives a nice warm glow to things.

      Reply
  2. BarefeetInTheKitchen says

    Posted on 6/9 at 8:03 am

    Leigh Anne, if I keep watching your site, I am in danger of turning into a crafty chick!! I love this idea. It looks fantastic.

    Reply
  3. Lorilee says

    Posted on 6/9 at 7:54 am

    Adorable. Something new to add to MY list! The only downside I see is storage! Isn’t that always the downside to tiered serving pieces!
    Blessings,
    Lorilee

    Reply
  4. Jeanette says

    Posted on 6/9 at 6:35 am

    I love it! Love the ones you have made in the past with pretty plates as well. Quick question, it is ok to hand wash (submerge) these even though they are glued or should you just wipe them clean?

    Reply
    • Leigh Anne says

      Posted on 6/9 at 6:43 am

      Good question Jeanette! I just use a damp rag with a little soap and wipe them off – they would probably be o.k. to submerge them but I just wipe them off. They really don’t get that dirty with just cookies or something sitting on them. Often with my cakestands I use doilies on the too and then the doily soaks up most of any grease etc.

      Reply
  5. Donna says

    Posted on 6/9 at 4:25 am

    Love it! I have seen these around the blogosphere lately and I too have a small addiction to serving pieces. You did a great job and I am happy to see that you used E-6000 glue which I have at home. No drilling! I started a Crafty Board on Pinterest. I will have to add this beauty to it! Thanks so much for sharing!

    Reply
Newer Comments

Primary Sidebar

Seasonal Posts

plate of spicy honey chicken

Spicy Honey Chicken

BBQ Ribs from the grill

BBQ Ribs

low country boil on a table

Low Country Boil {on the grill}

Garlic Herb Shrimp on a baking sheet

Garlic Herb Shrimp

Most Popular Posts

baked riblets

Easy Oven Baked Riblets

overhead shot of ooey gooey cake

Ooey Gooey Butter Cake

rolls in a white pan

30 Minute Rolls

Herb Rice

Trending Now

overhead shot of cinnamon rolls

One Hour Cinnamon Rolls

plate of smashed potatoes and a fork

Crispy Smashed Potatoes

overhead shot of bowl of almond chicken

Almond Chicken

baked riblets

Easy Oven Baked Riblets

No knead bread in a pan

Instant Pot Bread

Tomato tart pieces

Easy Tomato Tart

spoon full of mac and cheese

Crock Pot Mac and Cheese

Almond Torte

  • Crock Pot
  • Instant Pot
  • Chicken
  • Breakfast
  • Appetizers
  • Bread
  • Salad
  • Dessert

Order my Cookbook, Holiday Slow Cooker!

Buy Now!
Back to Top
  • About
  • Privacy Policy
  • Disclosure
  • Contact
© 2013–2026 Leigh Anne Wilkes Site Credits Designed by Melissa Rose Design Developed by Once Coupled