This post may contain affiliate links. Please see disclosure policy here.
This tutorial will show you how to build a dance floor using 2 x 2’s and sheets of plywood. So easy and less expensive than renting one.

I shared with you in a previous wedding post the story of our dance floor. When we decided to book a live band for the wedding I thought we needed a dance floor. My husband did not. We have a large backyard and plenty of grass and he thought dancing on the grass would be just fine.
I am not easily dissuaded or discouraged.
I got on line and immediately started pricing dance floors from rental companies. They are not cheap, between $700-800 for the size we needed. It wasn’t in the budget so I decided I needed to get creative.
To make a somewhat long, 5 month long story short, I had a dance floor and then I didn’t have a dance floor, I had a dance floor and then I didn’t. In fact I thought I had a dance floor until the Sunday before the wedding. It fell through five days before the event.
Remember I am not easily discouraged so I decided we were going to build a dance floor. Or rather my daughter Cali and her friend Hannah were going to build me a dance floor (with some help from dad of course.)
By this time I had totally broken Jim down and he agreed so we headed to Home Depot on Monday night (the Wedding Carnival was Friday).

Dance Floor Supplies
- 6 sheets of 1/2″ plywood
- 30 eight foot long 2 x 3’s – cut 18 of them into two 45″ pieces (you will have pieces leftover) This will leave 12 of the boards 8 ‘ long. They cut them for free for you at Home Depot.
- Nails and hammer
- Floor Paint and supplies for painting
- Painters Tape
- 6 Mending plates to join the pieces together
How Big is the Dance Floor?
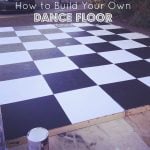
The dance floor measured 12 x 16 and was created out of 6 sections that were 4 x 8 which is the size of a sheet of plywood.

How to Build A Dance Floor
The whole neighborhood got involved or enjoyed watching the process taking place out in front of our house.
The above photo is about how involved Tessa got – she held a hammer for a photo but she was working full time so we need to cut her some slack.
- Create 6 frames from the 2 x 3’s that measure 4′ x 8′.

- Add four support pieces to each frame

- Nail a sheet of plywood to the top of each frame. Nail it down along the edges and across the support pieces.
- The moms got involved in this step of the process. Had to bring in the big muscles!
How to Paint a Dance Floor
The next step was the painting process. I decided that I wanted the floor to be checker board to go along with the carnival theme so I purchased black and white floor paint. We primed the boards first and then added a coat of white paint to each section.

Yes, I sat in a chair and watched it dry! I like watching paint dry.

After it was dry, the girls used blue painters tape to tape off the squares. The squares measured 24″ x 24″ so each 4 x 8 section had 2 x 4 squares.

Using small foam rollers the girls rolled the black paint into the taped off squares.

We waited for the paint to dry, removed the tape and we had a dance floor!

Finally, we numbered the pieces so that we knew how to put it back together once we moved it into the backyard.
The mending pieces were hammered into to hold the pieces together.
How Much Does It Cost to Build a Dance Floor
Total Cost of Dance Floor (including paint but not including labor) Approx. $300.00.
It was perfect and it was a wonderful addition to our carnival and YES, we needed a dance floor. Even my husband admits that now. It added such a fun element to the wedding and really got people dancing.


Who wouldn’t want to dance on a black and white checkerboard dance floor!!!
Kara says
Hi! I may make my dance floor for my wedding. Did you use any floor transition around the border so people didn’t trip or fall? Thanks!
Bev says
Could anyone trip up or off the dance floor?
Leigh Anne Wilkes says
That was not a problem for us.
Jodi says
This looks awesome!
What kind of plywood did you use?
Alyssa Robinson says
Hi Leigh Anne! This looks awesome and I’m thinking about making one for my mom’s wedding. I was wondering if you got this done all in one day because there are only a couple days left and dance floor rentals are too expensive!
Leigh Anne Wilkes says
If you had some helpers you could make it in one day.